Posts

Showing posts from February, 2025

Invitation to Followers - Crafting Journey News

Image
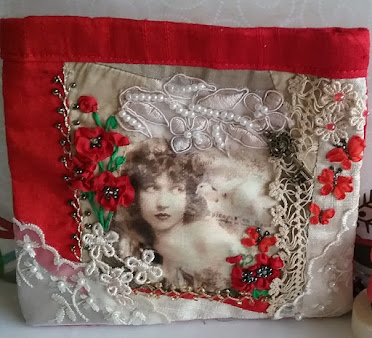
  Carol Daisy Crafts Blog! will be more of a focus for me now as I get to spend more time crafting. I shall spend time filming videos of SRE Stitch tutorials to add to the posts on the Silk Ribbon Embroidery site hopefully making them easier to follow. Should my SRE blog have had a positive influence on your Embroidery skills, and you would love to find more ways to put your knowledge to work, please join me on the Carol Daisy Crafts Blogspot. As an Aquarian, I have a creative side and a desire to discover new possibilities. Silk Ribbon Embroidery has been a love of mine but my inquisitive nature has taken me to discover more, including ways of adding SRE to other projects. I would really love for you to join me on this journey and hopefully discover interests and Inspiration for yourselves. Finding a feeling of peace in the Therapy of Crafting . Unleash your creativity and imagination as I share my crafting journey through various forms of textile arts and embroi...

Detached Chain in Cream Silk Ribbon

Image
Detached Chain Stitch No. 2 Satin - n - Cream  Detached Chain Flower spray  perfect for  any Bridal Accessories. Detached Chain Stitch  is executed in much the same  way as Lazy Daisy. It is best if you only use between 2 and  4 mm  ribbons in this stitch.  The wider ones are more difficult to shape. The material may be held in an Embroidery Hoop  or free in the hand.  Most of my students  have  found it easier to use the  hoop to begin with, leaving both hands free to work the ribbon. When using a hoop it is difficult to take the  needle  diagonally  across the fabric.  The fabric being taut your fingers will suffer, and I am sure you won't want to leave  blood stains on your work.  If doing this free hand take care that the fabric  is not gathering  as you stitch. When using the ribbon I personally prefer the  ribbon...

Free Designs Inspiration Sampler 2

Image
  Another Class Sampler, an option for  trying out your  newly learnt skills.  The base of this pillow is made from a selection  of   handkerchiefs,  some with special meaning  to myself.  The edgings and crochet or lace  edgings can also   be embellished  with  Embroidery Stitches. Take a piece of Pelon the size required for the  pillow allowing a  seam edge. Layer the hankies  over this cutting if necessary to  make into  one piece. Pin in position and use tacking  stitches  to  keep in position while you work.  This can be inserted in a hoop for the SRE  or free  stitch  in your hands for the Embroidery.  Adding the Embroidery Stitches first will make it  sit a little easier,  and along with the tacking stitches  will mean you have no pins  protruding to catch  the ribbon as you are creating flowers etc.  Also in class we...

Blog Refresh and Update. 15 years posting

Image
"Crafting is a way to escape from Reality" I have just completed an Update and Refresh of this Blog  which I started in 2009. Many changes  since that time in  Technology, Photography and  Posting. I invite you to  to check it out.  Many more Posts to come.    Caroldaisycrafts.blogspot.com

Smaller Crazy Quilting ideas

Image
To see the full post go to Caroldaisycrafts.blogspot.com Smaller Crazy Quilting Ideas I framed her with a selection of dupioni scraps I had  available.   Added a piece of vintage tatted lace in one  seam, and a few hand dyed lace flower remnants,  a brass key, organza embroidered lace trims.  Added Silk Ribbon to the image of the poppies with  ribbon Stitch, also the butterfly and then carried  the butterflies in a line through to the side. 

The Crafting Therapy that is Slow Stitching

Image
  Sometimes maybe we are just too hard on OURSELVES The idea that embroidery stitches need not be perfect may linger in the minds of those who have spent little time  with a needle and thread. This self-doubt should be  discarded when embracing this style.   There are no wrong stitches, fabrics, or color choices.  The essence lies in free interpretation. To continue reading go to:- Caroldaisycrafts.blogspot.com

Lavender in Silk Ribbon - Spanish

Image
  Here is another Lavender Variety,  created by using  simple  Ribbon Stitches and French Knots. Spanish Lavender - For the three flowers: 1 metre of each Cascade House Silken Ribbon 4990 and 5300 30 cm. Green Silken Ribbon 7560 30 cm. of   7 mm Mauve If this is not available Variegated Dyed  Ribbon is perfect  a it changes colours as  you work. 1:   Mark out a simple outline for the stems and flower body. Chain Stitch using 3 strands DMC 647 Embroidery Thread  for the stem and then I have wrapped it with another 3 strands. This gives it a slightly rounded and raised appearance. 2:    Fill the ovals with French Knots starting with the  paler Silken Ribbon scattered randomly and then add a  few more in the deeper Lavender Colour. I try not to pull these as tight, so they  will sit above  the others to create a layer effect.  3:   After completing the 3 Flower ...

Folded Rose / Gathered Combination

Image
  Should you wish to create as above, first stem stitch  the stem of the rose.   1 : Referring to the Tutorial for Folded Ribbon Rose Create in 7 or 13 mm. Silk Ribbon a small Folded  Ribbon  Rose for the centre. Put aside keeping the threaded needle attached.  2 :  With water erasable pen, mark a small circle. Thread a 20 cm length of the ribbon into the eye of the needle.  ( No need to thread completely as this is only to draw the ribbon through the fabric).   3 :  As in the Carnation Tutorial gather the ribbon into petals, stitching each down. Follow the outside of the circle marked  and you have the  option of two rows  of gathering as I have done or just one.  4 : Re-thread the ribbon in the Chenille Needle. Take the ribbon through to the back. At the same time the last gathered petal is stitched into place. With a wet cotton bud, wash out the pen line. Allow to dry. 5 :  Make a whole in the c...

Silk Ribbon Embroidery Design

Image
  Petite Rose Corsage  Running Stitch / French Knot Combination A simple way to make your work shine and step up a  notch  is to make use  of a Hand Dyed Ribbon / Variegated  Ribbon.  The changes in colour as you progress gives the  finished  result more dimension   and reality.  Plus I feel the dye adds a stiffness to the ribbon and  presents  the petals in a firmer way. This is a Stitch which  can be executed  with 4 mm or 7 mm or even (13 mm with some patience and difference in appearance ). My preference is in 7 mm. which is used in this instance. Using a plain silk dupioni or another fabric with a loose weave. Follow the images below or go to my earlier post - SRE- Running Stitch / French Knot Combination   Add some Ribbon Stitch Petals, Leaves, W rapped  Stem Stitch   and the  Corsage is complete. Additionally you could add  small  beads to  the Rose Centres or s...

Embellishing Images using SRE

Image
  Once you have mastered the Stitch Tutorials and Flowers in my  earlier Postings  your next thought might be in which way can  I apply these flowers to my own projects. I have quite a few years ago embroidered these bags,  pouches etc.  and thought  I would put the images online for  my followers to see.  These are just basic stitching  ( for the beginners ) and with experience can have much more added using your own discretion and personal taste. It is just a few samples of how a little added SRE can be so effective. Hope these can encourage you to take your  SRE to the next step.

Carol Daisy Craft Room Ribbon Stitch Design

Image
  Design in Ribbon Stitch Using Hand Dyed Silk Ribbon with Colour Variances  Following through from the Video here are a few more hints and notes  that may be of assistance should you be wanting to learn the most  common and useful of SRE stitches.  Typically it is used as a fill  stitch  for petals, leaves, insects etc.  The tutorial is based on a simple  design using a Hand Dyed  7mm Silk Ribbon.  ( It may be difficult for some to purchase pure silk  ribbon,  but it will reward you so much  more than Satin Ribbon with  appearance, shaping and texture). Vine is stem stitch 2 threads, Flowers and Leaves 7 mm Silk Ribbon.  (Hand Dyed Silk gives the variance as each petal is worked) More details are shown on Ribbon Stitch Tutorial  regarding the  shaping of the petals. You will see that I prefer to place a layer of pelon under my fabric. To me it makes a softer finish of the embroidery, an...

Design Creation using a Vintage Pansy Illustration.

Image
  For illustration purposes the Silk Ribbons used are listed, should  these not be available, others can be substituted as long  as it  is Pure Silk Embroidery Ribbon and is   necessary for the shaping and softness of this design. Lesson 1 Lesson 2 Lesson 3  Completion Available with other videos on my channel Carol Daisy Crafts