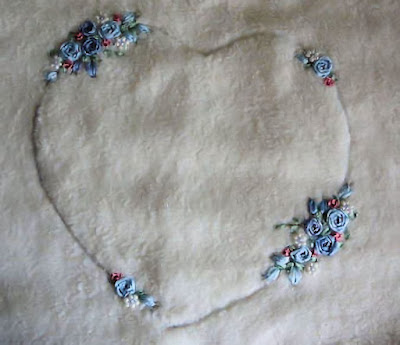
Rose Loveheart Blanket
Could also be embroidered with Two Intertwined Hearts
Stitches Used: Stem Stitch, Spider Web Rose,
Detached Chain, Ribbon Stitch, Running
Stitch / Colonial Knot Combination., Y Stitch.
Preparation:
Prewash the ribbons, then when dry, iron on a
silk setting before starting.
To transfer the design onto fleece, I suggest using
netting or light organza and a pencil. Trace the
design on this from the pattern, then with a
dressmakers chalk or water erasable pen transfer
it to the fleece. You may find though that
the pen, is a little more difficult to remove
from the fleece.
Firstly using Embroidery Cotton Thread ( 2 strands )
stem stitch the outline of the heart.
( Or for a more raised frame, wrapped chain )
Cut a piece of wadding the size of the blanket, and tack it
to the fleece. Take matching cotton thread and make a spoke
for the spider web rose, one at a time and embroider.
So as not to get the ribbon tangled in the other threads.
After making the spoke, do not cut thread, leave it at
the back of your work. Thread ribbon 25 cm in length
onto Chenille Needle supplied.
Bring it up to the centre of one of the spokes, leaving
a short tail at the back of the fabric. Stitch down
with thread. Twist the ribbon and thread through
the spokes. When completed bring needle to back
of fabric, carefully take ribbon through wadding and
stitch down. Should you have enough ribbon on the
needle, you can take the needle over to a position
to do a bud. ( At least 10 cm. Ribbon left on the
needle to do this. )
Stem Stitch in Green thread, the stems of the Leaves.
Place fabric now in Embroidery Hoop. All the other
stitching can be done with fabric in the hoop.
Detached Chain Buds: This stitch is the same as
Lazy Daisy in Thread. Cut Ribbon no longer than 25 cm.
and make the buds in each group. With green thread
make small straight stitches at the tips and Y stitch
around the bud and add a stem.
Ribbon Stitch Leaves: With green ribbon make all the
leaves, be careful not to pull the ribbon after each
one, best if you keep your finger on the last
completed stitch while you are making your next.
Follow the instructions given, wrapping the ribbon
around the needle, hold that firm and make small
running stitches down to the base of the ribbon.
Pull through as in colonial knots, taking it slowly
and let the ribbon run through under your finger,
so it doesn't curl and knot. Pull gently and keep an
eye on it, you will see the centre form as you do so.
( Should you have problems with this, use a large
French Knot in the ribbon )
Final Step is to make the bead flowers. Stitch the centre
coloured bead down first and then string the others on to
the thread and stitch into a circle. Add stitches
between to keep flat.
Make up Blanket with backing and trim as you wish.
Ribbon Embroidery can be hand-washed in a soft
washing detergent. Should the ribbon droop slightly,
hold a STEAM IRON above it and the steam should
lift it slightly. Do Not press the ribbon once you
have stitched it in.
For further assistance go to the stitch tutorials.
posts linked to the instructions above.
Running Stitch / Colonial Knot is worked the
same way as Running Stitch / French Knot.
Colonial Knot is constructed in a figure 8
and will give a higher centre to the flower.


Hello Carol...
ReplyDeleteWhat a beautiful project... your roses are so lovely and neatly embroidered, Its very very beautiful... Love the colour and pattern as well and yes you are very right that Hearts can be intertwined, and I am sure it will look more beautiful...I save it and may be try to do something... Lovely
Wish you a very Happy New Year
I would love if you come to visit me at
http://craftaworld.blogspot.com/
Love
Farah
Gorgeous, gorgeous, gorgeous! I wish I'd seen it last night. I pieced a Valentine CQ block for my foyer and began embellishing already. This would have really been special!
ReplyDeleteHola querida,
ReplyDeleteHe pasado para desearte un feliz 2011!!!!
Besos,
Lany
its just superb,gorgeous,may be i will try with 2 hearts interlaced.its making my heart also go on rolling ,wow.regards nilima.
ReplyDeleteGorgeus hearth .A happy new year !
ReplyDeleteTe envió mis mejores deseos de dicha y prosperidad para el 2011, desde México.
ReplyDeleteit lovely i like your creativety
ReplyDelete